Create IOs
What an IO is
An IO — for input/output — represents an element of your home: a lamp, a shutter, a switch, a temperature sensor, a switched socket.
Calaos distinguishes two families, and this distinction shapes everything else:
| Family | Role | Examples |
|---|---|---|
| Input | Calaos reads a piece of information | switch, sensor, detector, meter |
| Output | Calaos acts on something | lamp, shutter, socket, heating |
A lamp that comes on when a switch is pressed is therefore two IOs — an input and an output — tied together by a rule. They are not linked automatically: you decide the link, which then lets any switch control any lamp.
Adding an IO
Select the room concerned, then open the Add menu. You first choose the hardware family, then the device type.
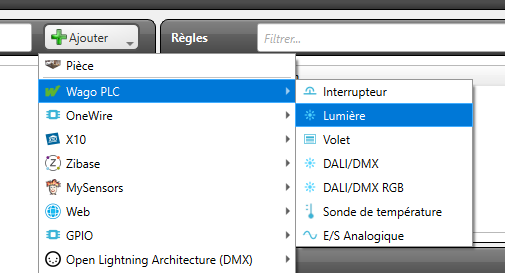
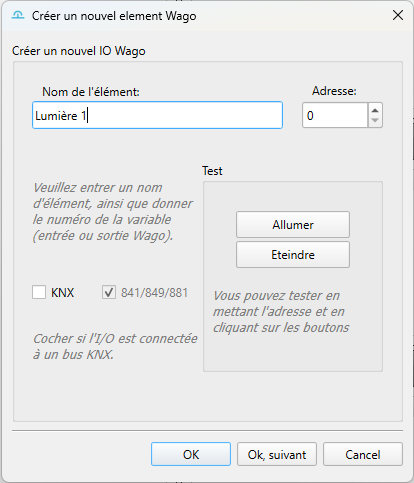
For example, for a lamp driven by a Wago PLC: Add → Wago PLC → Light. All that remains is to give it a name and the address of the output on the PLC.
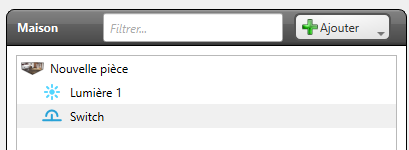
The IO then appears in the selected room.
The hardware families
Each family corresponds to a way of talking to your devices, and has its own page in the Supported hardware chapter:
| Family | Documentation |
|---|---|
| Wago PLC | Wago PLC |
| KNX | KNX |
| MQTT | MQTT |
| Zigbee | Zigbee |
| 1-Wire | 1-Wire |
| DMX / OLA | DMX |
| Philips Hue | Hue |
| GPIO | GPIO |
| WebIO | WebIO |
| Cameras | Cameras |
| Remote UI screens | Remote UI |
Some IOs depend on no hardware at all: internal variables, scenarios and time scheduling objects are handled exactly like any other IO in rules.
The device types
Whatever the family, the same broad types come back:
As inputs — simple switch, long-press switch, triple switch, analog input, temperature sensor, numeric value, character string.
As outputs — simple light, dimmable light, RGB light, shutter, smart shutter, analog output, character string.
Long press is a switch type in its own right. Rather than hacking a rule together with a timer, choose the right type at creation time: Calaos then tells a short press from a long one, and you can assign a different action to each.
The type also determines how the device is displayed in the interfaces: a shutter gets up/down buttons, a dimmable light gets a slider.
The properties of an IO
Once the IO is created, its properties window gives access to settings common to every type:
| Property | Effect |
|---|---|
| Name | The label displayed everywhere |
| Visible | Shows or hides the IO in the interfaces |
| History | Records state changes in the event log |
| Value logging | Sends measurements to the history database, to plot graphs |
Hiding an IO does not disable it: it keeps working in rules, it simply does not clutter the interfaces. This is useful for technical inputs nobody needs day to day.
Each IO type additionally has its own parameters — address, port, device identifier. Calaos Installer displays built-in help for each of them: it is the most up-to-date description, since it comes straight from the server.
Naming your IOs
As with rooms, these names will be read every day.
The name does not need to repeat the room: interfaces already display the IO inside its room. “Kitchen — Kitchen light” is redundant; “Ceiling light” is enough.
Do however clearly distinguish similar devices in the same room: “Ceiling light” and “Worktop spots” rather than “Light 1” and “Light 2”.
What comes next
With your devices declared, it remains to make them react: Create rules.